Just a quick post to say thank you to everyone for supporting my blogging efforts! I truly appreciate that you take the time to comment, like and share my posts. It was your support that gave me the courage to start this blog in the first place. THANK YOU!
I am also very thankful my blog was picked up early by a local magazine, Hudson Valley Parent. If you are already following The Whatever Mom blog you should receive an email every time I post a new entry. If you are not already following me here, please do!!
Get additional pics and updates on The Whatever Mom Facebook page! I will share my Hudson Valley Parent posts on all my Facebook pages!
If this is your first visit to my page- thank you for stopping by! You are welcome to join the party and get weekly updates. Simply click the small gray follow button in the low right hand corner and follow the instructions. To find out more about The Whatever Mom check the about me section.
Please feel free to comment below, or contact me via Facebook with craft ideas and questions!
Thank you all again from the bottom of my heart! Cheers!
I was prepared to write a whole fluffy craft piece about how to host your own glow in the dark egg hunt. I realized it is more important to share what happened behind the scenes during party prep.
Being a “whatever” mom is new to me. I am by nature a high strung personality. I like things to go my way, as planned. I had several plans for this night. It was going to be epic! Not only did I plan on glowing eggs but glowing treats too. I planned for glowing Jello and glowing frosted cookies accompanied by glowing Sippy cups of milk. My kids would ooh and ah over the spectacle. My husband would think, “Wow my wife is so talented!”
Tonic water farce
Turns out, the science guy on goscience.com is liar. Tonic water does NOT phosphoresce under a black light (at least not the bottle I purchased). I was more than a little disappointed when the Jello did not glow. That meant my frosting would not glow either. I shouted a bristly, “Whatever!” through gritted teeth and tried to move on. But, I carried that disappointment with me. I attempted a little razzle dazzle with glowing Sippy cups. Not what I imagined. It seemed so much simpler in my head. I thought, “OK, there’s still time to salvage this party. I’ll start filling the eggs early.”
Glow Sippy gone sideways
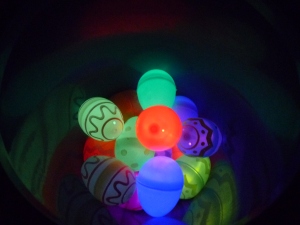
Now, all you need to make glow in the dark eggs, is a twisted up glow bracelet placed inside a plastic egg. You can get plastic eggs and glow bracelets at your favorite dollar store.
Twisted glow bracelet of doom
I couldn’t bend the bracelets small enough so I enlisted my husband to help. He tied them into a small pretzel shape and jammed them into the eggs. He only broke open six bracelets- releasing glowing ooze (Supposedly “non-toxic.” We’ll know more if he starts growing appendages). I was so disappointed that nothing was working according to my plan. This night did not look anything like I had envisioned. I was about to throw in the towel and call this idea of mine an epic fail. Then, I heard giggles and little voices squeaking with delight. My girls had picked up a pile of the glowing sticks and began running through the basement playing their own games. They used them to cast magic spells and send each other signals- all the while oblivious to the frustration building inside moms head. Suddenly it hit me, I didn’t need to get so worked up about what was going wrong. I simply needed to enjoy what was going right.
Actual glow egg
As soon as I let go and said, “whatever” (for real this time) the party turned out pretty perfect. My girls had so much fun hunting for glowing eggs, they didn’t even think to open them to look for treats. They took turns hiding eggs for each other and even cheered each other on. We had a lot of laughs and it was a total blast.
Learning to let go of perfection and the stress it creates in my parenting – that is what being a “Whatever” mom is all about.
I was prepared to write a whole fluffy craft piece about how to host your own glow in the dark egg hunt. I realized it is more important to share what happened behind the scenes during party prep.
Being a “whatever” mom is new to me. I am by nature a high strung personality. I like things to go my way, as planned. I had several plans for this night. It was going to be epic! Not only did I plan on glowing eggs but glowing treats too. I planned for glowing Jello and glowing frosted cookies accompanied by glowing Sippy cups of milk. My kids would ooh and ah over the spectacle. My husband would think, “Wow my wife is so talented!”
Tonic water farce
Turns out, the science guy on goscience.com is liar. Tonic water does NOT phosphoresce under a black light (at least not the bottle I purchased). I was more than a little disappointed when the Jello did not glow. That meant my frosting would not glow either. I shouted a bristly, “Whatever!” through gritted teeth and tried to move on. But, I carried that disappointment with me. I attempted a little razzle dazzle with glowing Sippy cups. Not what I imagined. It seemed so much simpler in my head. I thought, “OK, there’s still time to salvage this party. I’ll start filling the eggs early.”
Glow Sippy gone sideways
Now, all you need to make glow in the dark eggs, is a twisted up glow bracelet placed inside a plastic egg. You can get plastic eggs and glow bracelets at your favorite dollar store.
Twisted glow bracelet of doom
I couldn’t bend the bracelets small enough so I enlisted my husband to help. He tied them into a small pretzel shape and jammed them into the eggs. He only broke open six bracelets- releasing glowing ooze (Supposedly “non-toxic.” We’ll know more if he starts growing appendages). I was so disappointed that nothing was working according to my plan. This night did not look anything like I had envisioned. I was about to throw in the towel and call this idea of mine an epic fail. Then, I heard giggles and little voices squeaking with delight. My girls had picked up a pile of the glowing sticks and began running through the basement playing their own games. They used them to cast magic spells and send each other signals- all the while oblivious to the frustration building inside moms head. Suddenly it hit me, I didn’t need to get so worked up about what was going wrong. I simply needed to enjoy what was going right.
Actual glow egg
As soon as I let go and said, “whatever” (for real this time) the party turned out pretty perfect. My girls had so much fun hunting for glowing eggs, they didn’t even think to open them to look for treats. They took turns hiding eggs for each other and even cheered each other on. We had a lot of laughs and it was a total blast.
Learning to let go of perfection and the stress it creates in my parenting – that is what being a “Whatever” mom is all about.
Last year I discovered the simple beauty of plastic Easter eggs and fuzzy pom-poms. With Easter right around the corner I’m bringing these back! It usually buys me at least 30 uninterrupted minutes. I can almost hear my own thoughts while finishing the dishes!
First, I picked up some plastic eggs and pom-poms at the dollar store.
Pick up items at any dollar store.
Next, I dumped them into a deviled egg tray for easy access and storage. That’s it! Done! The kids will take care of the rest! (If you don’t have pom-poms you can use cotton balls).
Eggs and pom-poms
You can find an egg tray similar to this one at the dollar store. I just happened to have one on hand. You can also recycle an egg carton to store the eggs in. Use whatever works for you.
The first things my girls do is sort and match the colors by placing the pom-poms into the matching colored egg.
Color sorting/matching
Next they enjoy using kid sized plastic tweezers to count out the pom-poms and fill the eggs. (This is a great activity for developing fine motor skills).
Then they just like to make up their own games through pretend play. They grab handfuls of pom-poms and pile them up and mix them up. Sometimes they pretend to go shopping for eggs and fill up an empty shopping bag.
No matter which scenario they choose, we almost always end with – you guessed it- an Easter egg hunt. They like to take turns hiding the eggs and finding them. Of course I have to help look for the eggs too.
Last year when I first introduced this to my girls they were 28 months old. I was worried they’d eat the pom-poms, so I sat nearby while they played with them. They also enjoyed taking them into the bath tub, dumping the pom-poms into a bowl to mix with a spoon, and just comparing the fuzzy feeling of the pom-poms with the smooth feeling of the eggs.
This year they found a new way to play- Pom-pom soccer!
Use a straw to blow pom-poms across the finish line.
The first one to blow a pom-pom into an egg using a straw wins. I love that there are so many different ways to play with these simple things many of us already have around the house.
Got a favorite simple (mess free) activity you’d like to share?
Thank you to everyone for following my blog! You can also find me at at http://hudsonvalleyparentblog.wordpress.com/
I walk into a Vine Van Gogh paint night so excited to spend time with other moms (and a glass of wine). It really does not matter what we are painting, I am just happy to be out of the house and among other adults. In the last three years I’ve made due with stolen moments alone at the grocery store, or late night drives to run errands. FYI, none of those are fulfilling or deeply gratifying.
Connecting with friends.
The instructor shows us how to set up our canvas and lets us loose with paint. My mind is flooded with distant memories of moving a brush around on canvas in another life. It feels like a refresher course of all the art classes I have taken. Then without expecting it, it becomes a refresher course in how much I love painting. I spend so much time painting with my toddlers I have forgotten how much I love painting for myself. There was a time in my life (before kids, marriage, house) I couldn’t go a day without painting, or drawing something. Don’t get too excited I’m not an artist by any stretch. But, I am creative. I can see new ways to reuse something, or finish a project in simple easy steps and occasionally I can get downright crafty.
Remembering how this painting thing works.
Class shot.
I love my kids and I love that I get to stay home with them. I simply forgot the value of having my own space and time, or a project just for me. Something I clearly took for granted before kids. I feel guilty spending money on myself, or leaving when I know my kids will melt down. But, it’s OK to let dad feed the kids whatever for dinner, and so what if they skip a bath because it’s what dad needs to do to get through his night with the kids? The important thing I try to remember is it is one night. They will survive and so will I! I realize I am not spending hundreds on myself. The occasional expense of nurturing my own happy pursuits goes a lot further than just me. When I am personally fulfilled I am better at nurturing my family.
I love my time out painting and chatting (and I love escaping the monotony of laundry and the constant barrage of shrill screeches of“Mama! Mama! Mama!” that jumbles all of my thoughts). The class is nearly 3 hours long- which is long enough for me to reconnect with a long forgotten passion. Now, I can’t wait for the next class!!
Class photo.
We are all busy women, whether you’re a mom or working girl- what are some ways you keep in touch with your passions?
How often do you find awesome projects on Pinterest and think, “who has time for that?” Or, “I would never think of that!” That’s what inspired me to create these super simple busy binders! I used items I found at dollar stores. No need to use up my ink to print off a ton of pages. No need to laminate. These are re-usable, inexpensive and require very little time to make.
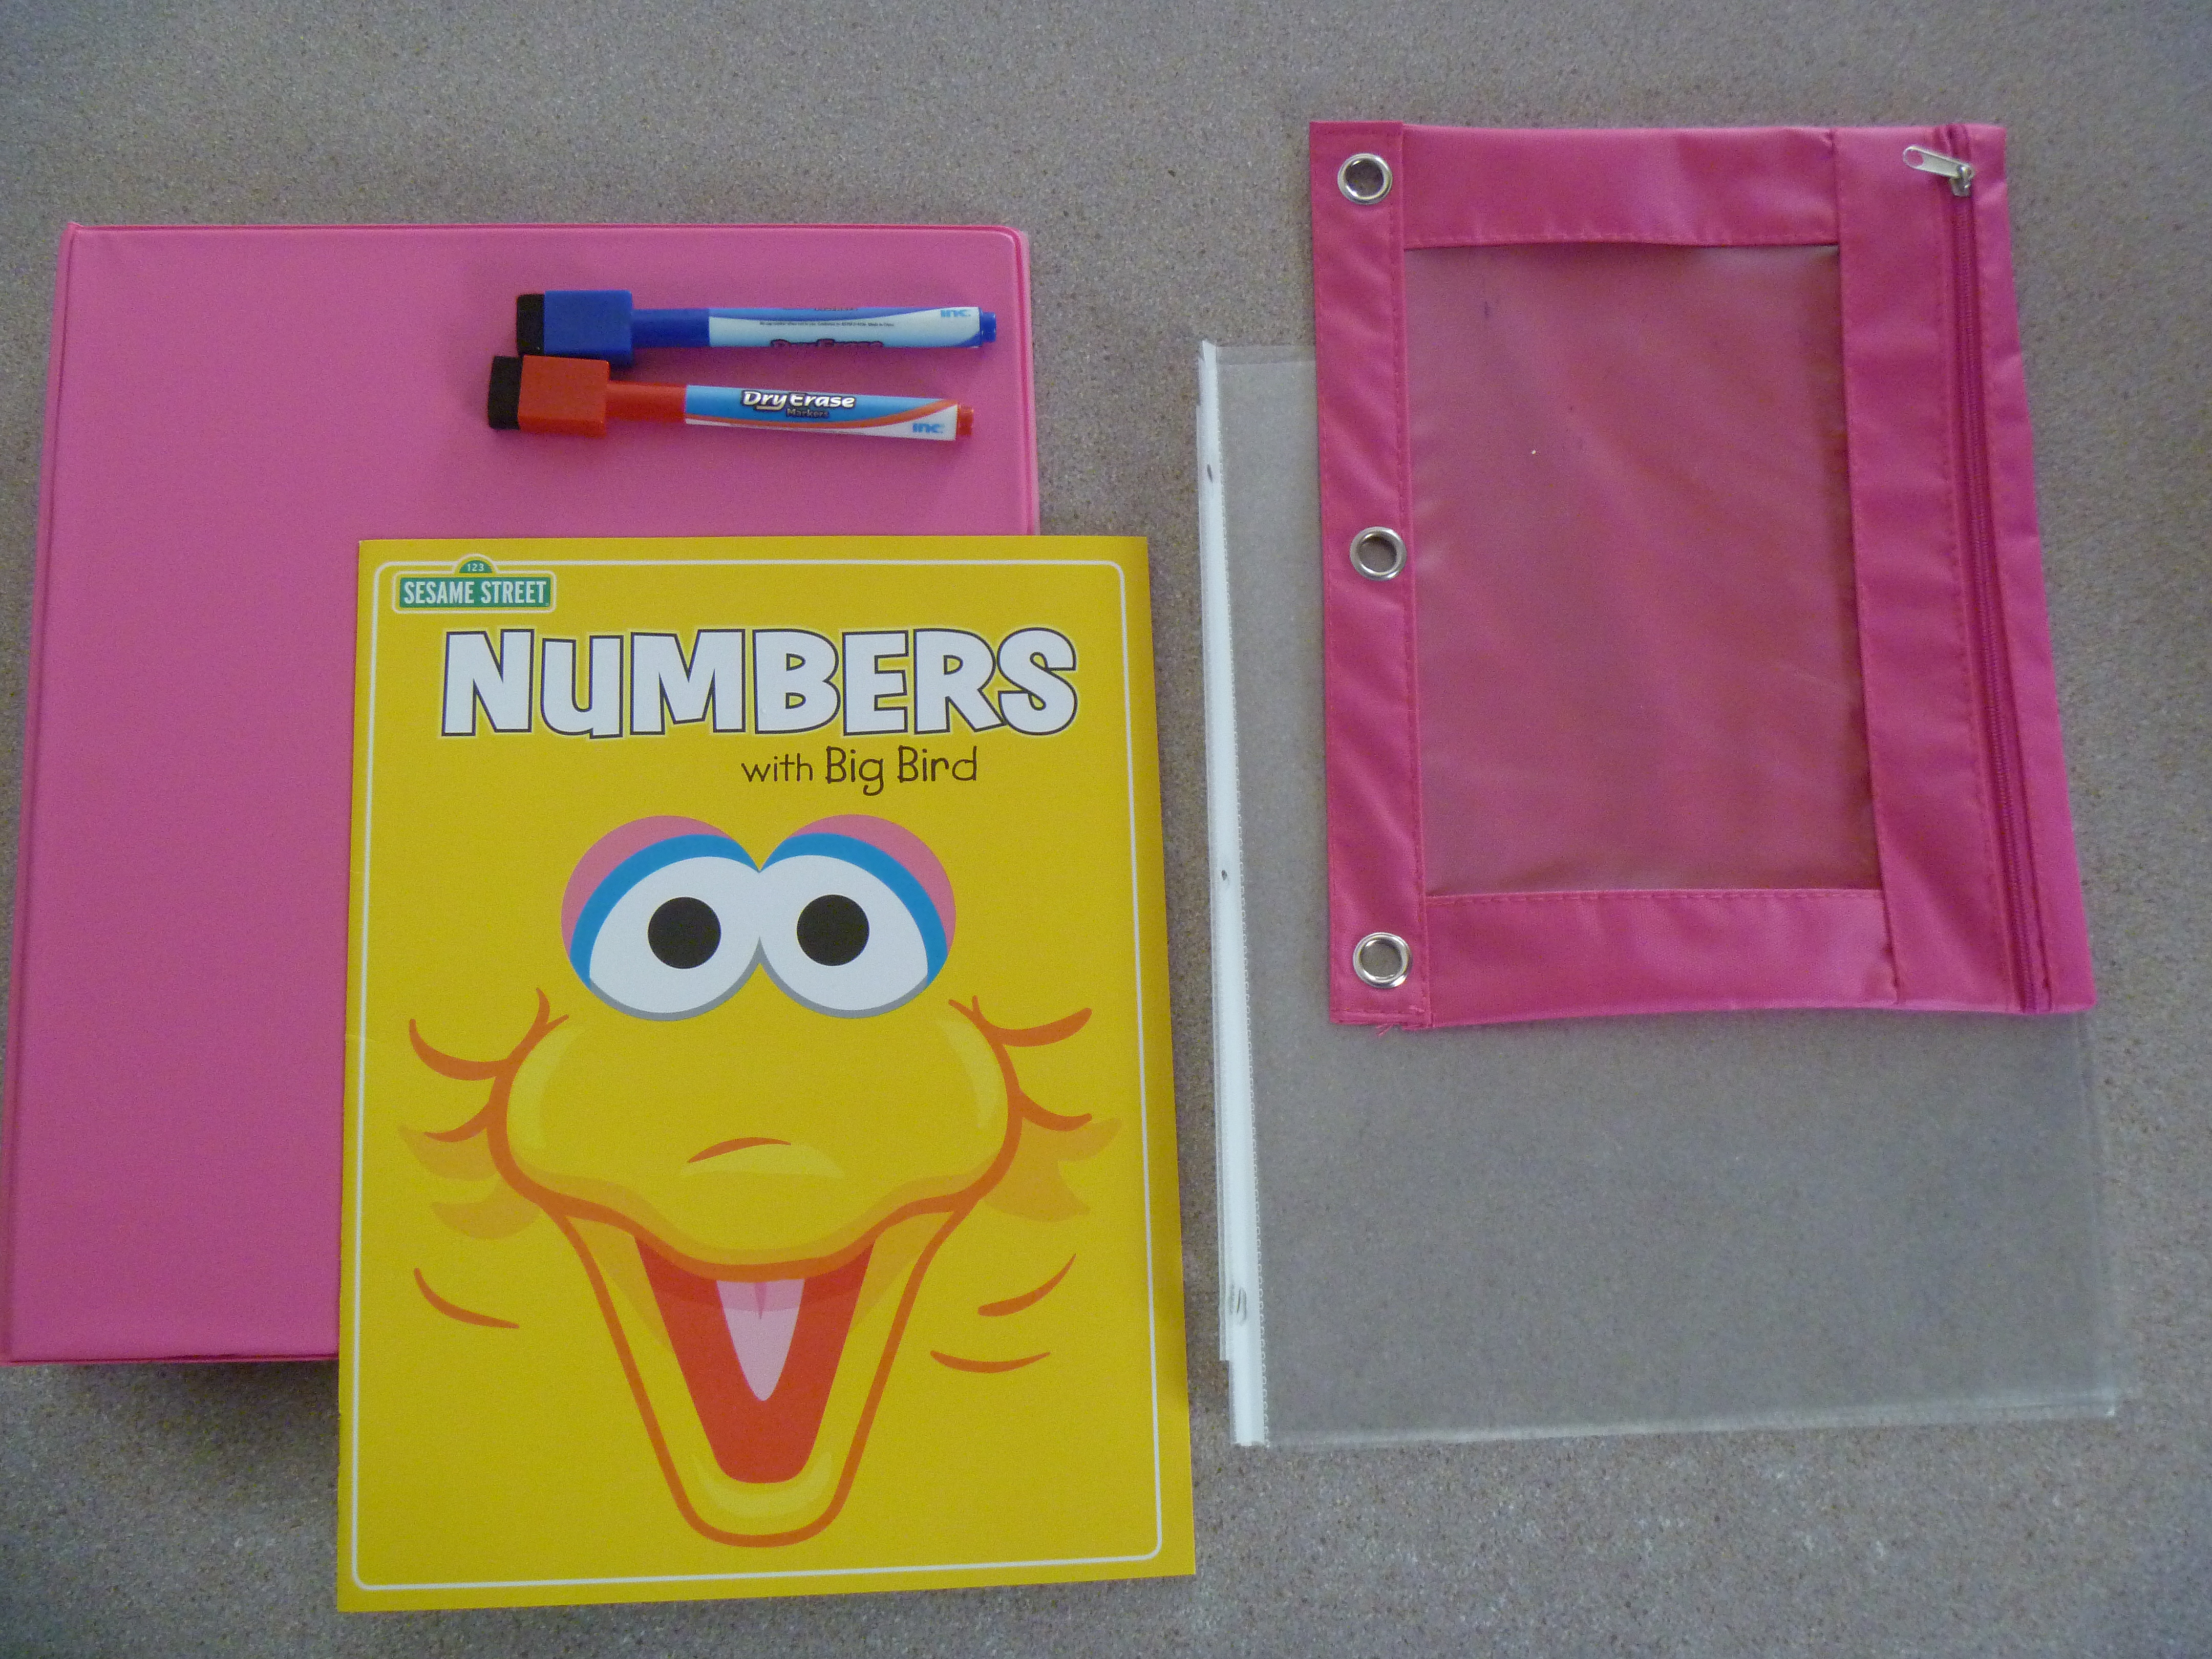
Materials for busy binder
I found activity books at the Dollar Tree. (Target has similar books in their dollar section). I picked up some colorful 3 ring binders at Big Lots for .90 cents each along with matching zipper pouches for $1.00 each. I reused some plastic page protectors and dry erase markers I found at home. So, each binder cost around $2.90. (I made 4).
Zipper pouch to always have pens on hand.
The zipper pouch in the front of each binder holds dry erase markers for easy storage. I especially like the dry erase markers with the felt tipped eraser caps. This way the girls can erase their marks on their own if necessary.
Be sure to use dry erase markers.Use book cover as first page in binder.
The first page of the binder holds the cover of the activity book. If you want to get fancy, buy a binder that includes a front and back clear view pocket. Place the front cover of the activity book in the front clear view pocket and the back cover of the activity book in the back clear view pocket. The clear view binders run about $3-$4 each. The plastic page protector is my cheater version.
Insert individual pages in pockets.
The following pages include activity sheets I detached from the book. I inserted one page per plastic sleeve.
Pocket protectors make it easy to erase and use again.
Now the girls can re-use the pages as many times as they’d like. I simply erase when they are finished, or encourage them to clean with a paper towel before putting the binder away.
Inside binder
I keep the binders on a shelf for easy toddler access.
Binders on shelf.
I have an open shelf area at the end of our counter that I keep busy activities for the girls to grab and play with any time they like. This has saved me during phone calls, while chatting with other adults and that rat race called dinner hour.
Open access to activity shelf.
I assembled all 4 binders in less than 20 minutes! The materials are easy to find, inexpensive and assemble quickly. No printing! No coloring! No laminating!
What are some busy projects you have to occupy little ones?
The Whatever Mom is a twin mom learning to let go of perfection. She shares her real life struggles with parenting through her blog and contributes her time and talents as a writer to Hudson Valley Parent and Masshole Mommy. When she isn’t writing you can find her chugging coffee, folding laundry and not judging other parents. Don’t forget to subscribe via email so you never miss a blog post again! You can also find her work featured on Mamapedia and The Novice Mommy.
In the spirit of St. Patrick’s day (or as my kids call it ‘Leaf Day’) we made Rainbow Rice boxes with little gold gems. We already made the traditional paper crafts with painted hand prints and shamrocks. So, I wanted something a little different and interactive.
This is how it went down:
All I used to make the colored rice.
I was expecting a much bigger mess than we made, hence the double layering of foil and paper on the baking sheet. I did not have parchment paper on hand, so I just cut open a couple of brown paper lunch sacks.
Baking sheets lined with aluminum foil and brown paper.
I filled 6 plastic zipper bags with 1 cup of rice.
Rice prepAfter color mix
I used 1 tsp. of vinegar and several drops of food coloring. I did not measure the drops of food coloring, but used a small amount to start and added more if I wanted more vibrant colors.
Layering the rice to dry
The kids helped me spread each colored rice onto the paper. I expected by adding vinegar and liquid colors the rice would be more wet. But, it just needed an hour to air dry. Be sure to spread it nice and thin one color at a time.
While the rice dried we added our gold pieces (gems) to the bins. We talked about St. Patrick’s Day, Ireland, Leprechauns, rainbows, and pots of gold while we cleaned and dried the gems. I was amazed by my kid’s questions. Our conversation felt like it was a lesson without being a formal lesson. While we waited for the rice and gems to dry completely we hung our St. Patty’s decorations around the house.
Gold gems serve as our gold pieces.Separated for bins
Once the rice was dry I separated it into two columns to divide between two bins (clear plastic shoe boxes).
Scooping the rice into bins
The kids chose to use a spatula to scoop and dump the rice into their bin.
I remembered I had left over black paper cups! Thought it made a great “pot” for our gold.
Black paper cups become our pot of gold.
I added small plastic shot glasses as little scoops for the rice.
Smaller scoop cups to sort our gold.
The whole project took around an hour and a half- including drying time. My husband noted the rainbow rice looked pretty similar to Fruity Pebbles. If you really want to you can dump cereal in a box and throw in some gold gems and be done. But, we really enjoyed the entire experience!
In case you missed it, it’s stiiiiill winter here in the Northeast! There have been a few sunny days since our last beating of snow. But, it is still very cold and hard to get outside with the kids. Moms in my circle are longing for the days we can meet at a park and let our kids run free, and not have to mess with layers and layers of winter clothes. Come on Spring!
To keep my girls busy (and to keep our sanity) we are visiting different libraries to take advantage of a variety of free programs. From story time to crafts to music and movement classes and so much more. This week we traveled to two new libraries. While at one story hour we discovered the Le Petite Picasso painter program offered each week. The mere mention of paint (and opportunity to make a mess) and my kids are all over it. We came back the very next day for our Picasso experience!
This little library has such a warm and colorful space for kids to play and create. We donned our painting smocks and were ready to paint … bubble wrap! Who doesn’t love bubble wrap?!
Sunny yellow on a winter’s day.
Of course they used their hands to mix the paints and pop the bubbles. It’s all a great sensory learning experience, and just plain fun!
Little hands love paint.
Different sized bubbles offered variety of texture.
Once the kids had a chance to play with the paints for a bit, the librarian leading the class placed plain paper over the top of the bubbles. The children pressed down on the paper and rubbed their hands over it. Pealing the paper back revealed a unique print.
Taking advantage of programs at different libraries is a great way for us to get out of the house on a cold day, make a mess that someone else cleans up and we make some new friends- all for free! Paying for two kids to attend painting class, or private lessons is costly. Attending painting class at the library for free is a huge savings for us!
This is such a simple activity to do at home with your kids. All you need is a roll of bubble wrap, some plastic on the floor, paints and brushes. If you have those cute little painter pallets great- if not, just dump the paint right onto the wrap and let your kids go.
Does painting at home make you nervous? If you’re embracing the whatever philosophy you’ve already wrapped your kid in plastic, moved away all the furniture and have plenty of wipes on hand! This of course is to alleviate our own stress by attempting to contain the mess. The beauty of this project is when the kids are finished you can roll it all up and toss it in the trash. If you want more Eco-friendly put paper on the floor and recycle.
Tip: I rarely pay for paper for my kids to paint on. I save the paper that comes in shipping boxes. I just fold it neatly and lay it flat. Now I have paper any time we need it for painting, crafting, or to use as underlay to keep a project area neat.
What are some ways you save on art/craft supplies for your kids? Does your library offer any fun, free programs?
There was a beautiful break in the winter weather for all of 3 days a couple of weeks ago. I’m talking 40 degrees, blue skies and sunny. Everything started to melt and it felt near tropical! Now, we are back to zero temps. Ick.
During the big melt there were puddles everywhere. Big, deep puddles just begging for the jumping! I loved jumping in puddles as a kid, but now as a mom all I can see is laundry, wet boots and someone’s going to cry because they are “too cold.” But, on this glorious day a friend’s words rang in my ear, “let your kids be kids for those who can’t. Let them jump in muddy puddles and make a mess!”
Last year my friend Gloria discovered a local charity created by a family who lost their little boy Ty to cancer. He was five years old and dreamt of jumping in puddles while he was stuck in bed. The Ty Louis Foundation http://www.superty.org/ has a wonderful way to raise funds for cancer research through The Muddy Puddles Project http://muddypuddlesproject.org/ . Each year the organization hosts a Mess Fest where children are encouraged to jump in the mud and make a mess. It turns out anyone can host a party in their town, or even in their back yard and all proceeds go directly to childhood cancer research.
After finding this charity my friend immediately held a mess fest in her back yard. She literally flooded a spot in her yard and made a giant mud pit where the kids were encouraged to jump in. Afterwards everyone made giant messy sundaes. It was easy to see how much fun the kids had stomping in the mud with permission. It was also easy to see every mom cringe when they saw the amount of mud they had to clean up.
Backyard fun for a good cause
When I saw our street lined in puddles last week, I knew I had to dig deep into my ‘whatever’ philosophy to get passed the sight of dirty laundry and muddy shoes and just let my kids go have some fun. So, I dressed them in their snow boots, new rain coats and said, “Let’s go find some puddles to jump in!” The joy on their faces was beyond precious and the memories we made together was worth more than my worries of wet socks. (And, no one cried!)
I am learning that the messiness of childhood doesn’t last forever, but the memories those messy moments make will last a life time! No one has ever said, “remember that time we kept our house spotless? Yeah, that was fun!”
Did you know private schools now host play dates? OK maybe this info is new just to me?
Over the weekend, my girls and I attended a free bread making class at a local Waldorf school. I had no idea what to expect. The only thing I know about the Waldorf philosophy is that it is child lead. That’s it.
This is by far the most beautiful school room I have ever seen. It is warm, inviting and full of sunshine. Everything is simple and clean. It is like being in someone’s small home. It’s a new school so everything in it is still perfect.
Beautiful sunshine for the winterscape on the window sill.
Our time began with circle songs before moving to the child sized table to make our bread. The children were encouraged to knead the dough while the teacher sang songs and quietly explained the steps. My kids are still singing, “Pat-a-cake Baker’s Man.” We rolled our dough into a long tube before rolling into the shape of a snail. It was so cute! I never would have thought to do that- the kids loved it!
Little hands patting the dough.
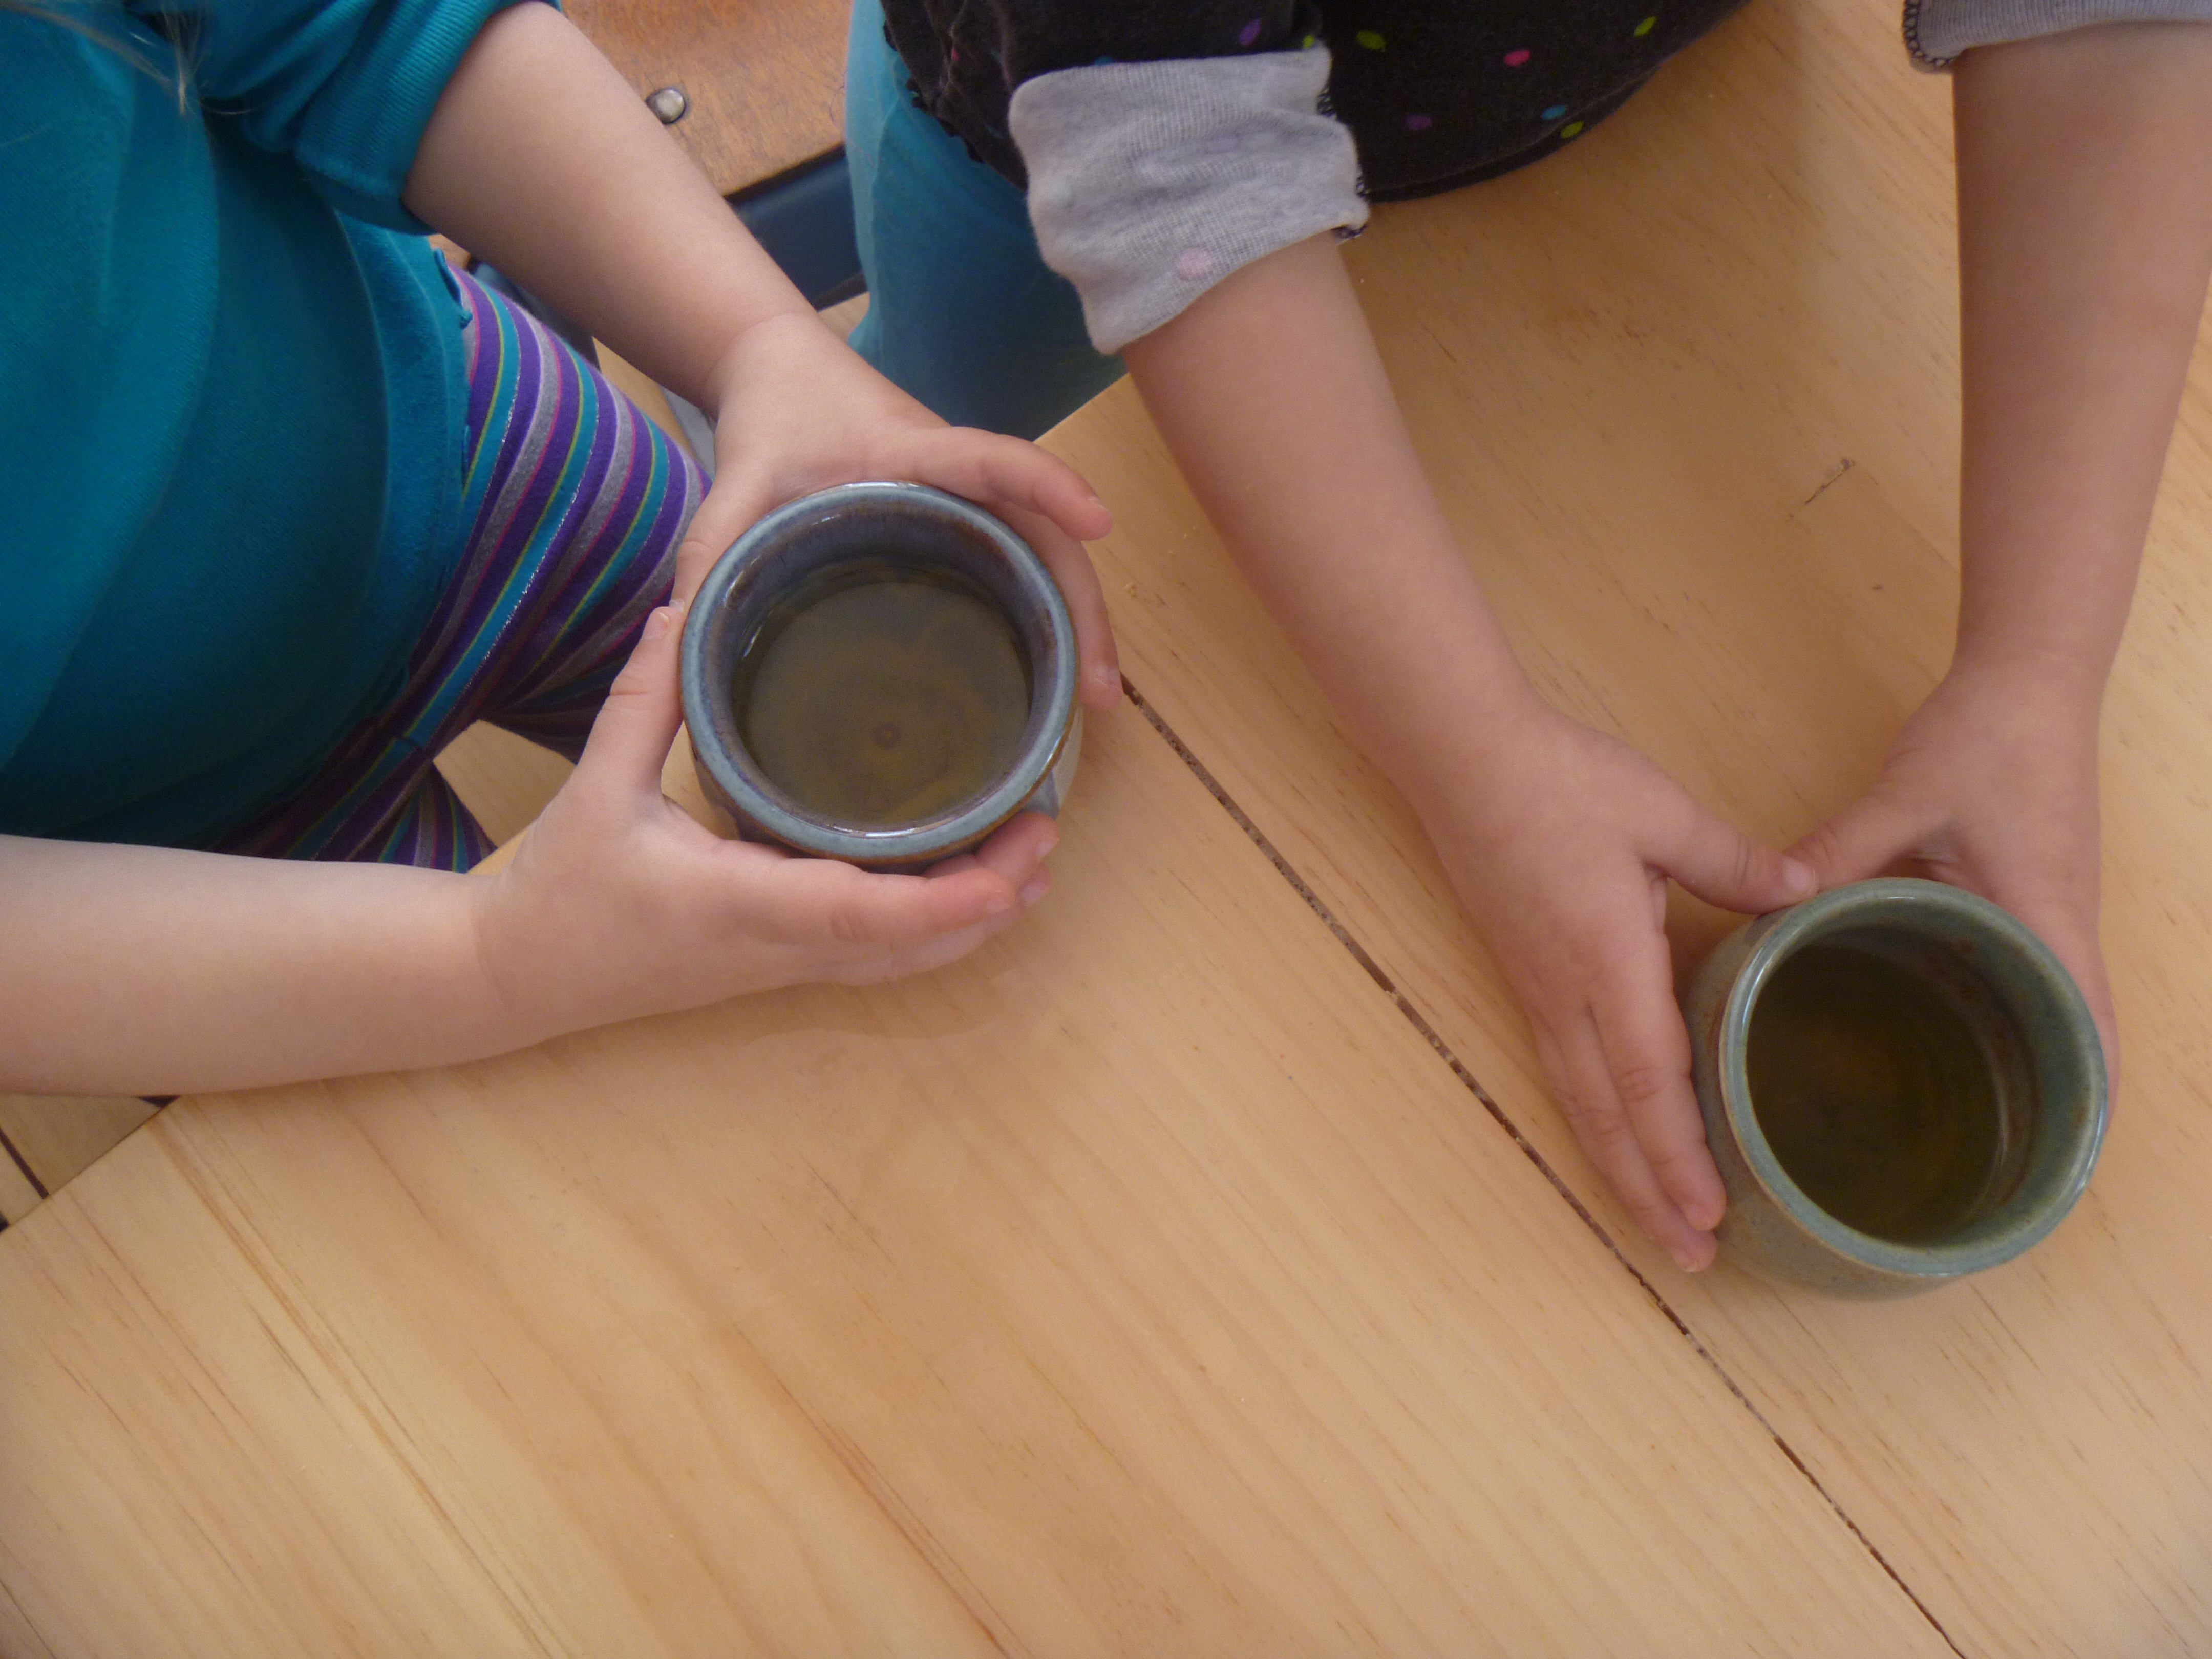
After the snails went into the oven we enjoyed a snack with our new friends- warm bread with butter, apples cut into a spiral (almost like a slinky) and tea. Each child had their own perfect sized little pot of mint tea.
Tiny little pots of tea for each child.
Everyone cleaned up their own area at the table and the kids were sent off to play while the moms were left to chat. I have to say that is always my favorite part of play dates.
Every toy in the room is exciting to a small kid, from the wooden doll house with realistic furniture to the excitement of packing a small suite case. There are no hard plastic toys, or anything that requires batteries. My kids especially enjoy the hand crocheted stuffed elephants and felted hats. I enjoy that my kids had a really wonderful time!
Wooden dollhouse.
The girls could not wait to dive into their snail breads once we returned home. It was a really fun time spent with friends on a really beautiful sunny day!