Category: Healthy living

My Winter Wellness Guide

Happy Light | Nature’s Bounty Vitamin D3 | Nordic Naturals Omega 3 Fish Oil | Sketchers Ultra Groove Sneakers | Lady Bird Deluxe 2021 Planner | Stash Organic Tea

It is no secret that I need the sun to feel my healthy best. Living in the North East where we have dark, cloudy winters, getting enough sunshine is a challenge for me.

I have never been diagnosed with Seasonal Affective Disorder (SAD), but I can tell you my mood changes through the winter. I am less patient, I feel more stressed and less motivated. Over the years I have developed a winter wellness routine that helps me get through the dark days of winter.

I use the Happy Light from Verilux – this little light creates the same feeling of being in the sun. I use it in the mornings during my treadmill walks. During the winter, the morning is too dark and cold for me to walk outside, so I bring the outside in. I set my light up near my treadmill and walk for 30 minutes.

I take my supplements. I normally run deficient in vitamin D3 (known as the sunshine vitamin) and have for many, many years. I supplement all year, but in the winter I change the dose according to my doctors recommendation. Omega 3 fish oil also help increase a positive mood. Always check with your own doctor if these supplements are safe for you to take.

I get outside when I can. If the sun is out, I am out too. I grab my Sketchers and head out the door for a quick walk around the block. I turn on the tunes and soak in the light and get those endorphins pumping.

I ditch my late night to-do list. I am a natural born night owl and often stay up way to late to get things done. But that always leaves me with a grumpy attitude and a hangover effect. You know when your head is too foggy and you just want to crawl back to bed? I make myself go to bed at the same time as my kids (around 9:30 or 10). I read a little, or write out my to-do list in my planner for the next day instead of trying to get it all done right now.

I drink tea – a lot of tea. I’m not giving up coffee any time soon, but I love a good cup of hot tea in the middle of a cold day. I try to be mindful of stopping what I am doing and grabbing some tea while I phone a friend, or call home to chat with my mom. It’s like a little happy hour routine in my day that keeps me connected.

I take time to center my thoughts. I am a mom, writer, homeowner, wife and dog mom. I have a lot of things to do in a day and my brain often feels like someone dumped a big old box of ping pong balls and they are all bouncing out of control. I take 5-10 minutes each morning to meditate, or simply stand at my open back door and listen to the birds and take three deep breaths.

I may not get to do these things all in one day, but I strive to work them into my daily routine. Each little action creates a bigger impact on my mood and how I am feeling as a mom.

Do you have a winter wellness routine? I’d love to hear more about how you make time to take care of yourself.

Roxanne Ferber is a twin mom, writer and owner of The Whatever Mom blog. She spends most of her time learning to let go of perfection and sharing her messier parent moments with other moms. You can follow her Facebook page to see the messiness unfold.
Join Me for a virtual International Family Summit

Post contains affiliate links. I make a small commission for purchases at no cost to you.

I am excited to share that my friend Dr. Orlena has invited me to be a guest speaker in her Fit and Fabulous Family International Summit! It’s a virtual 3 day summit just for parents!

Dr Orlena has invited 17 amazing speakers, all of whom are parents, so they know your struggles! Each of the speakers will talk about a different aspect of health and wellness. For example, I’m talking about how to create easy selfcare routines for overall wellness.

Dr Orlena’s Fit and Fabulous philosophy focuses on 4 pillars of healthy living.

1. What we eat.

2. Exercise

3. Sleep 

4. Emotional wellness (how we reduce stress and create a loving atmosphere in our homes.)

Because we are all busy parents, just like you, each video is 15 minutes or less to maximize your time, and covers different aspects of all 4 pillars.

Why Attend?

Do you worry about your family’s health and wellness?

Do you want a long healthy life for you and your kids, but life seems to get in the way of your goals?

The goal of this summit is to show you how to create healthy living habits, so you and your family can feel fit and fabulous! We’ll show you how to make it easy and fun!

The event is entirely FREE for 3 whole days from Friday December 4th to Sunday Dec 6th.

You can find out more here.

Life Time Ticket Option

If you’d like to have lasting access to the videos, Dr. Orlena has created a lifetime ticket, so you can watch the videos whenever you want. This makes it so much easier for busy moms!

The lifetime ticket also includes other fabulous products that have been donated by contributors.

Until Tuesday 8th Dec the lifetime ticket will be just $47.

On Tuesday 8th Dec the lifetime ticket goes up to $97.

Want to win some prizes?

Simply click to share this link on your Facebook page and tag Dr. Orlena to enter.

See you at the summit!

Roxanne Ferber is a twin mom, writer and owner of this blogspace. She spends a lot of time trying to find balance and teaching other moms that it is OK to embrace the messier parts of parenting! Follow her on Facebook for her less than perfect posts.

Creating a Healthy Home Fragrance for Fall

This post contains affiliate links. I make a very small commission on purchases made through using these links.

Before kids I had a major candle addiction that typically peaked as the Fall season began. I love all the scents of autumn and anything with a warm cinnamon or a hearty clove smell had to be in my collection. Those famous little spices warm my home and soul as the temperature begins to drop. Once I had babies, I learned how unhealthy burning candles can be for indoor air quality, not to mention how anxious I felt leaving an open flame for tiny exploring hands to find. Since then, I’ve discovered healthier ways to bring those seasonal scents into my home without all the toxins and worry.

Here are my favorite ways to bring the smell off fall safely into my home:

Oil diffuse

ESSENTIAL OIL DIFFUSER

You can use an electric oil diffuser without any worry of heat, flame or burning. Simply fill the with water and add in a few drops of your favorite essential oil. One of my favorites to diffuse during the fall and winter months is Germ Away Organic Essential Oil Blend by Three Sister’s Herbals. The antiviral properties of thieves oil help purify the air and won’t leave behind toxic chemicals. Plus, it is made with clove and cinnamon, two traditional fall scents. I also love to use it in my ceramic wax warmer. I add one TBSP of coconut oil ¼ teaspoon of ground cinnamon and 5-10 drops of Germ Away Oil. The light of the tealight candle adds ambiance and warmth as it diffuses the protective elements of thieves oil into the air. You can use this same recipe in an electric wax warmer to avoid the open flame around little ones. Be sure to keep it far enough out of reach the kiddos can’t pull it down.

I also use the Germ Away Hand and Surface Essential Oil spray to wipe down high touch surfaces like light switches, doorknobs, faucet handles and countertops. It safely adds a scent of fall to my home while keeping germs at bay. And because it safe to use around babies and animals, I can hand this job off to one of the kiddos without any worries.

LIGHT A FIRE

Nothing feels warmer or more soothing in the fall than a crackling fire. Unfortunately, I do not have a fireplace in my home, but I have found a way to recreate the scent and feel of a warm fire, without an actual fire. A friend of mine gifted me Palo Santo sticks to burn like incense in my home. The scent made by this tiny stick of wood is as comforting as any fire. Simply light it, let it burn for 30 seconds before blowing it out and leaving to sit in a fire safe dish (I use a ceramic saucer). This burns cleaner than store bought incense which can be full of chemicals and respiratory irritants, plus there is no open flame to worry about. You can use other wood sticks like cedar, hickory, and pine to fill your home with that feeling and scent of a warm fire.

DRINK TEA

I find that a simple cup of chai tea (which uses cinnamon and cardamom) elicits a feeling of warmth and coziness. Other flavors I love are cinnamon apple, pumpkin spice, citrus and cinnamon spice, and cranberry. The health benefits of drinking tea are well documented but stopping long enough to enjoy a cup of tea is a great way to relax. Simply allowing your tea to steep a few minutes before drinking will surround you with a familiar fall fragrance.

How do you fill your home with the smells of the season?

Roxanne Ferber is a twin mom, coffee addict and freelance writer. She will write about almost anything you want her to for a small fee. Just check out her about me section to find out how to hire her.

Prep These Easy French Toast Rolls for the Week Ahead!

My kids have fought me on eating any kind of veggies since their toddlerhood. Now, they are almost ten. These picky eaters dominate our meal time choices, but they aren’t always winning the war. I sneak veggies inside of their favorite foods undetected all the time. For breakfast, lunch and dinner. They have no clue.

I typically meal prep our breakfast for the week ahead on Sunday. I like stuff I can freeze for a quick reheat in the morning. Now that my kids are older, this method makes it easier for them to make their own breakfast. This is a huge time saver for us all!

So… this weekend I made sausage stuffed French toast with some hidden sweet potato in there. I tried to make it two ways, the traditional frying method vs. baking in the oven. Even though making one big batch in the oven at once is convenient, frying the rolls individually made for a better texture. And it hid the miniscule pieces of orange potato better.

Here is what you need:

12 of your favorite sausage links

12 slices of your favorite bread

3 eggs

2 TBSP of sweet potato puree

1/2 tsp vanilla extract

1/2 tsp maple syrup

Dash of cinnamon

2-4TBSP coconut oil

Rolling pin

* If you do not have sweet potato puree on hand, you’ll need to start by peeling and dicing a sweet potato and boiling until soft enough to mash before adding to the egg mixture. I made the sweet potato puree while I pre-cooked the sausage links in the oven. You can also use summer squash puree which you can find in the freezer section of your grocery store.*

Once you have your puree and cooked sausage you are ready to begin!

EGG MIXTURE

Crack open 3 eggs and dump into a shallow dish. Add sweet potato, vanilla, maple syrup and cinnamon. Whisk together until well mixed and no large clumps.

ASSEMBLING ROLL UPS

Use the rolling pin to roll flat each slice of bread (I did four at a time because it’s an easier amount to work with and it is faster than just one at a time). Place a fully cooked sausage on one edge of the flattened bread and roll together. Next, dip the stuffed bread roll into the egg mixture and lay seam side down on a plate.

COOKING

I fried in batches of four to make assembling easier and to leave enough room in the pan. Heat 2 TBSP coconut oil in frying pan. Place each roll up seam side down into the pan. Let cook 2-3 minutes before turning. Be sure to cook all sides.

I stored the rolls in a flat layer in a freezer bag for the family to grab what they need and make for their breakfast. This made one dozen rolls which my family gladly enjoyed with a favorite fruit and glass of milk.

What do you think? Would you hide veggies in your kids favorite foods?

Roxanne Ferber is a twin mom and freelance writer, also known as The Whatever Mom. She is on a mission to connect struggling moms with little ones with her community to laugh, grow and embrace the messy parts of parenting so that they feel empowered and confident in their mom choices.

Prep These Easy Chicken Dinners Ahead This Week!

Now that back to school is here and life is a little chaotic with a new schedule to work with, I find meal prepping a giant life saver. I actually get a little excited to see my hard work stacked up neatly in the freezer. Knowing that most of my meal prep work is done takes a lot of stress off of my plate, especially on those crazy days where everything else seems to be going wrong, or I am running behind.

As I was prepping I stopped quickly to take a few pics of what I was making to show you how easy it is to make two different chicken dinners ahead of time to stash in the freezer for later in the week. I made Honey Mustard Chicken to serve with rice pilaf and I made Thai Chicken Soup. One package of chicken split between two different recipes and I was done in minutes.

HONEY MUSTARD CHICKEN

1 lb. chicken breast (I use thighs because it’s usually cheaper and tastier)

1 bottle of your favorite honey mustard dressing or marinade

1 package of French cut green beans

Salt and pepper

1 gallon zip seal freezer bag

Place chicken pieces into bottom of the bag, pour one half of the bottle of honey mustard dressing over the chicken and then dump the frozen veggies on top. Sprinkle in some salt and pepper. Press all of the air out of the bag before you seal it and stack in the freezer. That’s it for prep!

When you are ready to cook, remove the prepped meal from the freezer and place in the fridge overnight to thaw out. Empty contents into the crock-pot and be sure to arrange with green beans on the bottom and chicken on top. Cook on high for 3-4 hours. *Every crock-pot heats differently. Mine cooks really fast, so I only need 3 hours for this meal.* Serve with rice, pasta or roasted potatoes (you can get prechopped potatoes in the produce section or in the freezer section to save more time).

THAI CHICKEN SOUP

1 lb. chicken breast (thigh definitely is best for this recipe, but either works)

1 jar of salsa

1/4 cup peanut butter

1 lime

1 TBSP soy sauce (or coconut aminos)

1 can coconut milk

1 gallon zip seal freezer bag

*optional serve over cooked rice, or rice noodles.

Place chicken pieces in the bottom of the bag. In a separate bowl add peanut butter, juice of one lime, soy sauce and the jar of salsa. Mix until it is all combined and pour over chicken in the bag. Seal and freeze.

When you are ready to cook, remove from the freezer and leave in the fridge overnight. Put the mixture into the crockpot and allow it to cook on high 3-4 hours. *Crock-pots may vary in cooking times. Mine will cook this meal in 2.5 hours.* The last half an hour of cook time, shred the chicken and add in can of coconut milk. Allow to simmer for remaining 30 minutes. If you chose to serve over rice, you can get those really quick 90 second microwave rice packs that will bring this meal together quick. You can even delegate that small part of dinner to a helper.

That’s it! Two recipes to prep this week that will take you as much time as it takes to read this post. Enjoy! Oh and don’t forget to prep those breakfast smoothies too! If you try any of these feel free to comment below, or stop by The Whatever Mom Facebook page to share, or find me on Insta.

Roxanne Ferber is twin mom and freelance writer doing whatever it takes to find extra sanity in the day.

Is it Time to Hire Professional Help?

After nearly six months at home with my family here around the clock, I might be ready to lose my mind. I cannot tell you how many messes I have cleaned up, nor how often I’ve heard myself yelling, “pick that up” or “put that back where you got it!” or “don’t even think about stepping over that one more time!”

I am officially burned out from all of the cleaning and sanitizing. I don’t know about you, but I like a good deep clean right after summer to clean up all the mess we dragged in through the season. Since I am so tired of it all, I am seriously considering hiring a cleaning service to do the heavy lifting for me.

4 Reasons You Can and You Will Get a Cleaning Lady

We aren’t ready to have a weekly cleaning person come into our home, but we could definitely use some help with a deeper cleaning. The folks at E&J Cleaning and Floors have provided deep cleaning and sanitizing services for businesses and residents throughout the Capital District. They have perfected their sanitation levels and protocols throughout this Pandemic, and they are ready to help you too! Their team will arrive to your home with masks and gloves and stay at a safe distance while they work.

Not only can they sanitize high touch surfaces by hand, but they also offer an Electrostatic Disinfection Technique to apply an EPA approved sanitizing solution to surfaces that lasts for months. A great way to protect your home as we head into flu-season.

Visit their Facebook and Instagram pages to see before and after photos of their residential, furniture and floor cleanings and what a great job they can do! Having someone else shampoo the couches and carpets will save me a ton of time and energy that I just don’t have right now, while planning our return to remote learning for two kids, working from home, meal planning and wiping down all the door knobs.

If you are worn out by all the extra cleaning, or trying to balance all the extra messes with working and cooking and everything else that comes along with this Pandemic life, do yourself a favor and hire someone who can help. Treat yourself to a little extra time in your week, or month and let someone else do the heavy lifting. You can use that time to relax in the back yard reading a book, or taking the kids for a drive for ice cream. If you hire someone for a weekly cleaning, count that time as self care and head to your local drive through to pick up lunch or dinner. Hiring extra help definitely leaves room for sanity in our day.

A clean and sanitized home is one less thing to stress about as we head into back to school season, holiday planning and worries about keeping our family safe. Call / Text For Your Free Estimate Today (518) 419-4683

(This is a paid post, but all opinions expressed are my own).

My Daily Smoothie Hack

I have to confess, I am addicted to drinking smoothies. Not only are they easy to make, but I can just toss a bunch of stuff in a cup without measuring and it still tastes good. The one thing I don’t like, is the clean up. Plus, rummaging around for ingredients and pulling them all out of different locations in the kitchen while I am barely awake, is a pain.

It is so tempting to sign up for a smoothie subscription and have premade smoothies delivered to my door step. I even found a local company to source them, but then I saw the price. It will cost me around $100 for one dozen premade smoothies. I can’t justify spending that much just for my personal breakfast each morning. I’d save time on the prep, but I’d still have to dispose of all the packaging and shipping materials after I transfer all the cups to the freezer. That still takes up time. But man, I’d sure love the convenience and simplicity of dumping a cup of ingredients into a blender.

So….

Click photo to activate code.

That’s what I do!

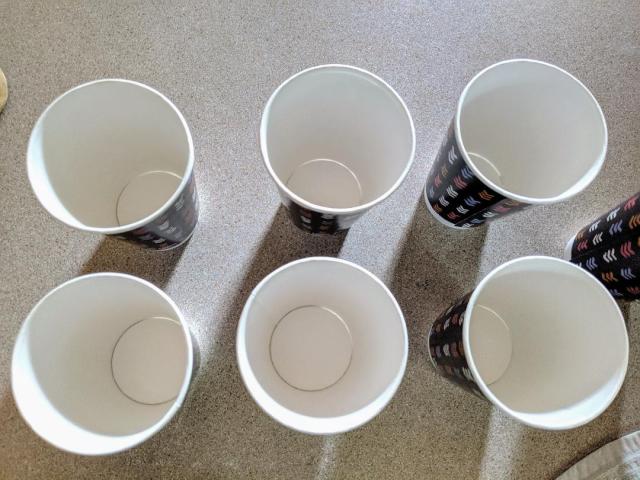
I found some left over disposable coffee cups with lids stashed away on a shelf in my basement and realize they make the perfect DIY grab and go smoothie cups. I make seven smoothies ahead of time, stash in the freezer and grab one each day. My kids have caught on to this and will grab one for themselves occasionally. They won’t make their own smoothies if they have to lug out all the individual bags of produce. Now that mom has done all the prep work it’s suddenly fair game. At least they are eating healthy and feeding themselves, right? In the future, I’d like to switch out the coffee cups for glass jars with lids to minimize waste, but since my kids are young and clumsy, paper cups do the trick.

Ready to see how easy it is to make a weeks worth of smoothies in about 10 minutes?

Line up seven freezer friendly cups.

Pull out all your favorite fruits and veggies to divide between containers. You can add nut butters or protein powders, seeds or any extras you like in your smoothie.

Just layer in each ingredient, attach the lids and put in the freezer.

When you are ready for a smoothie, remove one from the fridge and fill container with your favorite milk or water (are you a creamy smoothie drinker or a watery smoothie drinker?), dump the entire cup into the smoothie blender and give it a whirl. Then you can dump the mixture right back into the cup to take along with you. If you need something fancier to transport, I’ve attached a couple of options here in this post.

I topped each cup with a piece of waxed paper before adding the lid. This provides an extra “seal” against ice crystals and it keeps the fruit from absorbing any funky flavors from the freezer. Now I have breakfast already made for the entire week (as long as neither of my kiddos takes one for themselves).

Now you have a full week of breakfast (or snacks) for significantly less money and with less wasteful packaging to have to cart to the curb. I love a good hack that gives me more for less!

Our favorite combination so far is bananas, blueberries, strawberries, cherries, kale, spinach, pumpkin seeds and peanut butter. What do you put in your smoothie?

Click photo to activate code.

Contains affiliate links. I make a small commission from the sales made through this site.

Frozen Treats for Your Furry Child {Dog Moms this is for You!}

**Post contains affiliate links, which means I earn a small commission for orders placed using nthose links.

Summer is finally here, and it has been so hot! Of course, when it is hot outside, our minds drift right to ice cream and icy treats. Our pup always gives us the sad eyes while we enjoy our ice cream, so of course we have to spoil him too. Except dogs shouldn’t eat dairy and the puppy ice cream in the stores we purchased a few years ago was made entirely with chemicals. Not one drop of food. We really questioned what was in it when it didn’t even melt while sitting in the direct sun. Yikes!

After making some strawberry and banana ice cream cupcakes for ourselves, we set out to make some fun bite-sized frozen treats for our best friend (and sometimes the most well behaved child in my home).

My furry child knows when we are whirling up frozen bananas, he is going to get a treat too. In fact, we have a special bone shaped silicon mold just for this recipe. If you couldn’t tell, he is a bit spoiled by his #dogmom and family.

If you want to make these for your fur-baby you do not need a special mold, you can just fill a lined muffin baking tray and put in the freezer. Before you serve them, simply peel off the paper and put the cupcake into your pup’s bowl and I guarantee they will eat it up!

Here is what you need:

2-3 overripe bananas (you know the ones the rest of the family won’t touch) peeled, sliced and frozen.

1 TBSP peanut butter (make sure it is natural, made without Xylitol).

Splash of non-dairy milk.

Blender or food processor

Silicon mold, or paper lined muffin baking pan

Place the frozen bananas in the food processor and add a splash of milk to help break up the bananas. Once the bananas begin to break up (about 1-2 minutes in the processor) add in the peanut butter (or another nut butter you know your dog can have safely). The consistency should begin to look like soft serve ice cream.

Scoop the soft serve bananas into your silicon mold (we used mini dog bone shapes) or into a lined muffin tray and place in the freezer for one hour. Pop the shapes out of the mold and store in freezer safe container. Serve on a hot day or when you think your doggie could use a tasty treat.

If you want to make dairy free ice cream cupcakes for yourself, you literally make them the same way. Except maybe make the cupcake sized treats for the humans? Listen, I won’t judge you if you use the little tiny bone shapes. They are supper cute.

Our guy loves this easy ice cream recipe so much, we always make him his own batch to keep in the freezer. Just look at the excitement on his face!

Roxanne Ferber is a twin mom, writer and blogger. She enjoys the finer things in life like drinking coffee in total silence and driving alone in the car listening to her own play list on full blast. You can join her private Circle of Moms Facebook group if you need mom support (but there’s a strict no selling stuff policy) or follow along on The Whatever Mom Facebook page if you need some laughs. Thanks for reading along!

——–> SHOP NOW WITH THESE READER EXCLUSIVES! <——–

T-Shirt

USE CODE: ROXANNEFERBER for 10% off your purchase!

Tumbler

USE CODE: ROXANNEFERBER for 10% off your purchase!

Also, in a Mug

USE CODE: ROXANNEFERBER for 10% off your purchase!

Dairy Free Ice Cream Cupcakes

Picking your own berries and fruit is a great way to get kids outside and enjoying nature. Strawberries, cherries, blueberries and raspberries are all in season right now. And we are here for it!

This week we picked 4 gallons of strawberries and 8 lbs. of sweet cherries. We definitely could have picked more, but the storm clouds were moving in fast. We climbed into the car to go home just as the first raindrop fell. Perfect timing! My kids love cherry picking the most because they can climb the trees to reach the top branches. Thankfully, cherry trees are’t terribly high. Tomorrow we plan to pick blueberries and I can only imagine how many we will come home with.

After we picked all of our strawberries, I washed them and divided into freezer bags and tossed in the freezer. This assures me they will be usable later. I can’t tell you how many times I’ve let the berries sit for too long and wasted them, literally spoiling the fruits of my labor.

We have our standard uses for Strawberries. I toss them into our smoothies, pancakes and baked goods. And every year I make fresh strawberry ice cream. I make it right in my food processor and it is ridiculously easy.

I also make frozen banana ice cream pretty regularly. So, when I eyeballed those sad little bananas on my counter just turning brown, I had an idea. Why not make banana strawberry ice cream cupcakes? I’ll throw a little peanut butter into the banana ice cream for protein and it will practically be a health food! ~ genius

Here is the recipe I whipped up for my family to enjoy. It is dairy, gluten, soy, dye free and there is no added sugar. We did add a layer of graham cracker crumbs between the ice cream layers, but that is optional. Next time I am going to make the strawberry ice cream with coconut milk to see how that changes the texture. This makes six cupcakes, however, there will be about a pint of additional strawberry ice cream you can tuck away for yourself for later. You’re welcome!

I hope you make these and enjoy! Do you get out to pick your own berries? What do you make with all of those sweet berries?

Roxanne Ferber is a blogger mom and freelance writer. She enjoys the sweet silence of kids sleeping in and has a crippling coffee addiction. Motherhood has changed her in many ways, but remaining non-judgey and ready to support other moms are her strong suits. If you’d like to work with her, visit the work with me link in the side bar. If you want to send her happy thoughts or share your motherhood story drop a line at whatevmom@gmail, or find The Whatever Mom on Facebook.

Eco-Friendly Play Kits from Love Play Create

Summer time is here and I am stocking up on all the play kits and science experiments I can to keep my kids busy. My kids are almost ten, but they still enjoy creating with playdough and using their very active imaginations. Since we are an eco-friendly family, we are always looking for healthy options for playing and living.

I purchased two awesome play kits from Love Play Create because everything is made with love and attention to detail. My kids fell in love with the bumble bee and the dragon themes. Take a look at what’s inside!

How cute are these bees? The play dough is made from all natural ingredients and stored inside glass mason jars which keeps the playdough fluffy for longer. All the play things my kids use to build their imaginary meadow, or bee hive are made from paper, wood or glass.

The shipping materials are all paper based and can be put in the recycling or compost bin, which we love! For preschool aged players this would pair perfectly with a story about bumble bees in the garden or how bees pollinate our food supply. Planting flowers after playing with bees helps little ones connect the busy work of bees! (Always supervise little ones while playing with small parts).

The dragon theme box is an equal favorite and truly indulges a creative imagination. The toad stools are hand painted wine corks and the adorable dragon cookie cutter is reusable. Don’t you think this set calls out for an after play time tea party with dragon shaped cookies to decorate? This is such a fun box!

Here’s what my kids say:

What is your favorite part? The playdough is fluffier than store bought.

What do you think of the accessories? These things are fun to use to design the picture I have in my mind.

What do you think of the materials? I love that it’s safe for us and healthier for the earth!

Which theme do you like better? I love them both, I just can’t decide!

There you have it, we are in love with these adorable play boxes! Now you can get yours for 10% off THROUGH SEPTEMBER 1ST 2020!! That’s the entire summer! Check out all the awesome themes available to keep your kids busy at the Love Play Create Etsy store, and use code WHATEVERMOM.

What is your kiddos favorite way to create?

Writer Bio for The Whatever Mom
error

Building a community one click at a time.